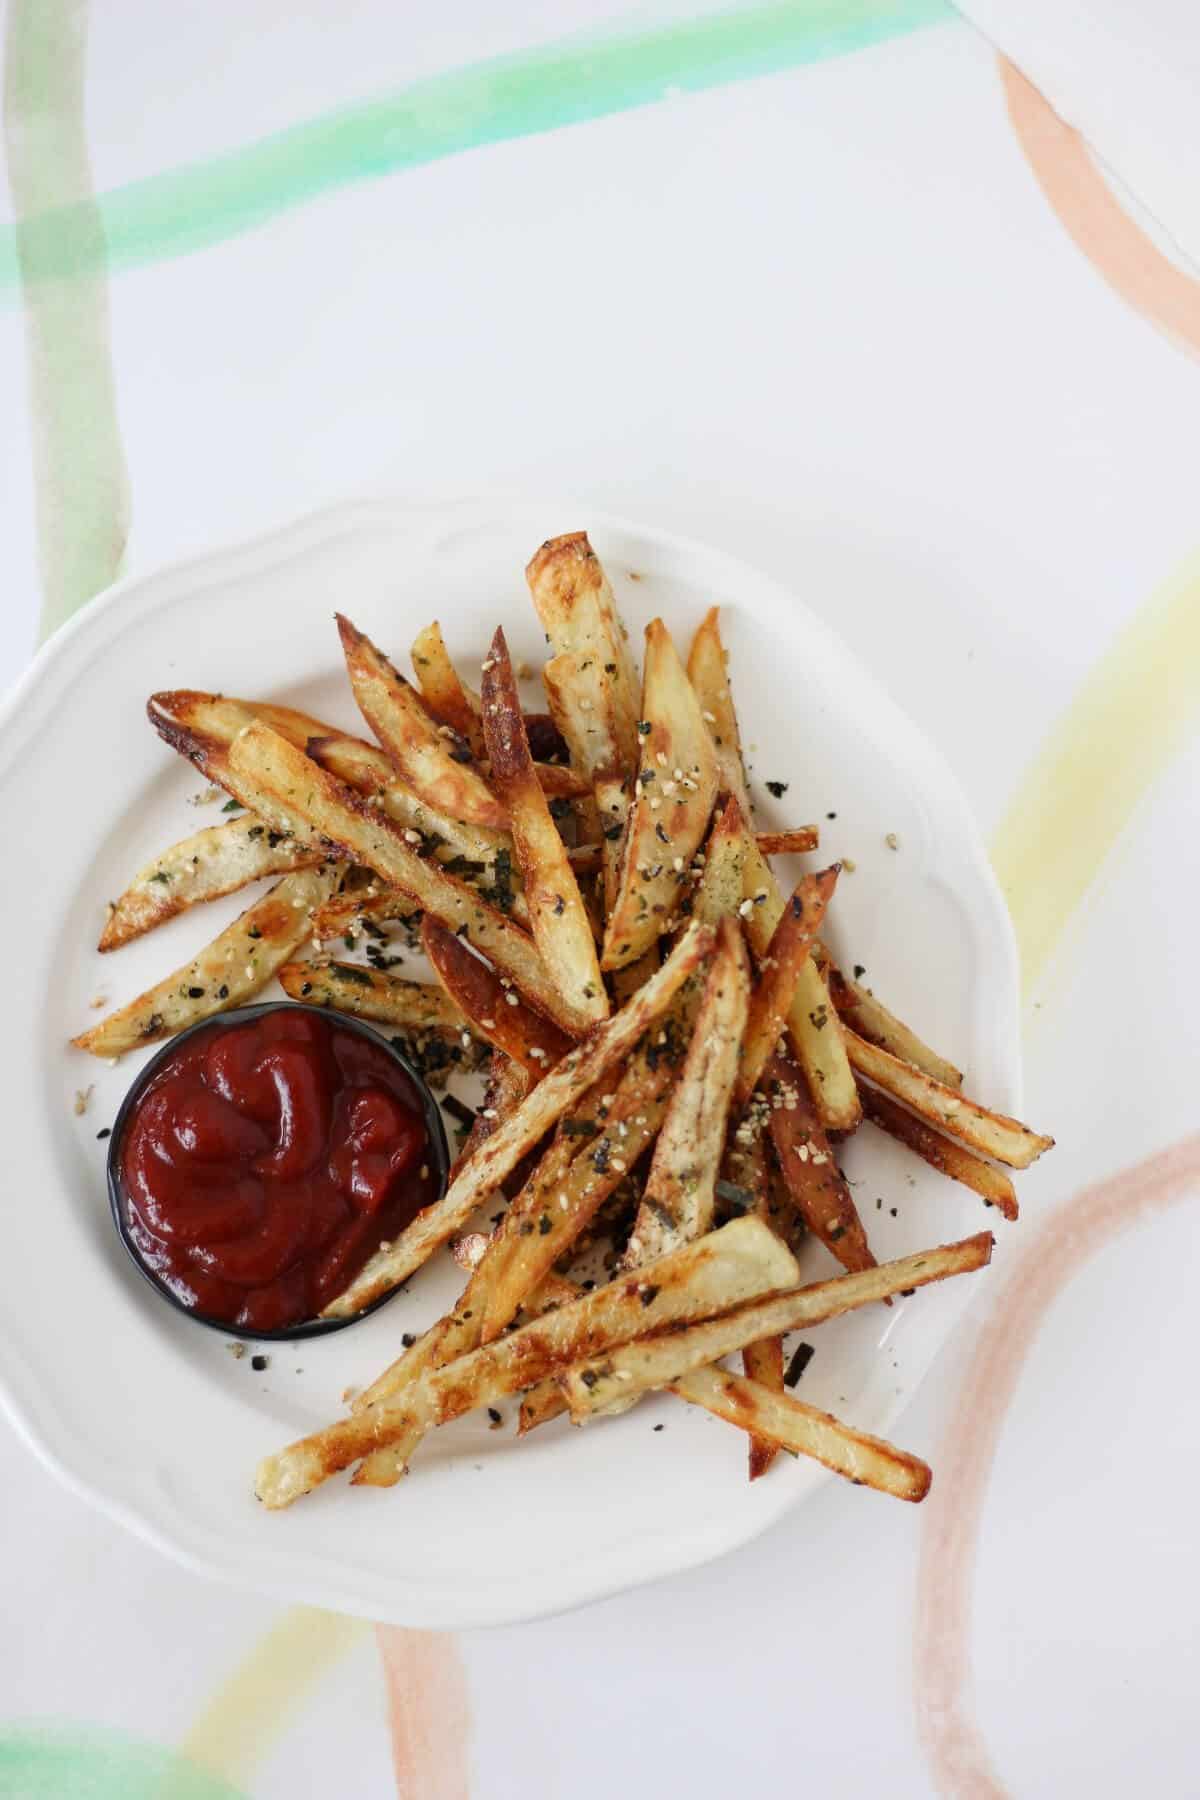
These furikake fries are seasoned with furikake, making them super savory and flavorful! This Japanese-inspired appetizer (which has recently become a staple on a number of restaurant menus in California, Hawai’i and beyond) is easy and equally as tasty when made at home.
Ingredients
Furikake
Furikake, if you’re not familiar with it, is a Japanese seasoning blend typically sprinkled on top of rice.
The most bare bones furikake is made with shredded nori (roasted seaweed) and sesame seeds.
That being said, most Japanese, as well as Korean and Chinese, supermarkets I’ve seen (in the Bay Area, Los Angeles area and Orange County) stock multiple variations. There’s furikake with everything from bonito (bits of dried fish, and my favorite) to ume (pickled plum) to crunchy rice balls.
I like using a basic furikake for these fries, though anything goes with potatoes. So as long as you like the type of furikake that you’re using, you’re good to go.
Russet Potatoes
Russet potatoes are my usual go to potatoes (see these baked curly fries with za’atar, almond milk mashed potatoes, or the crispy potatoes on top of this whole roasted cauliflower). They’re cheap, readily available, and the texture ends up crispy on the outside while still being creamy on the inside when you’re making french fries.
How to Make
First, prep the potatoes.
Wash and peel the potatoes (doesn’t have to be perfect, so don’t worry if there’s a tiny bit of skin left on).
Then, cut the potatoes into rough matchsticks by halving the potatoes lengthwise, then slicing each half into the approximate width you want the fries to be. Then cut each slice into fries.
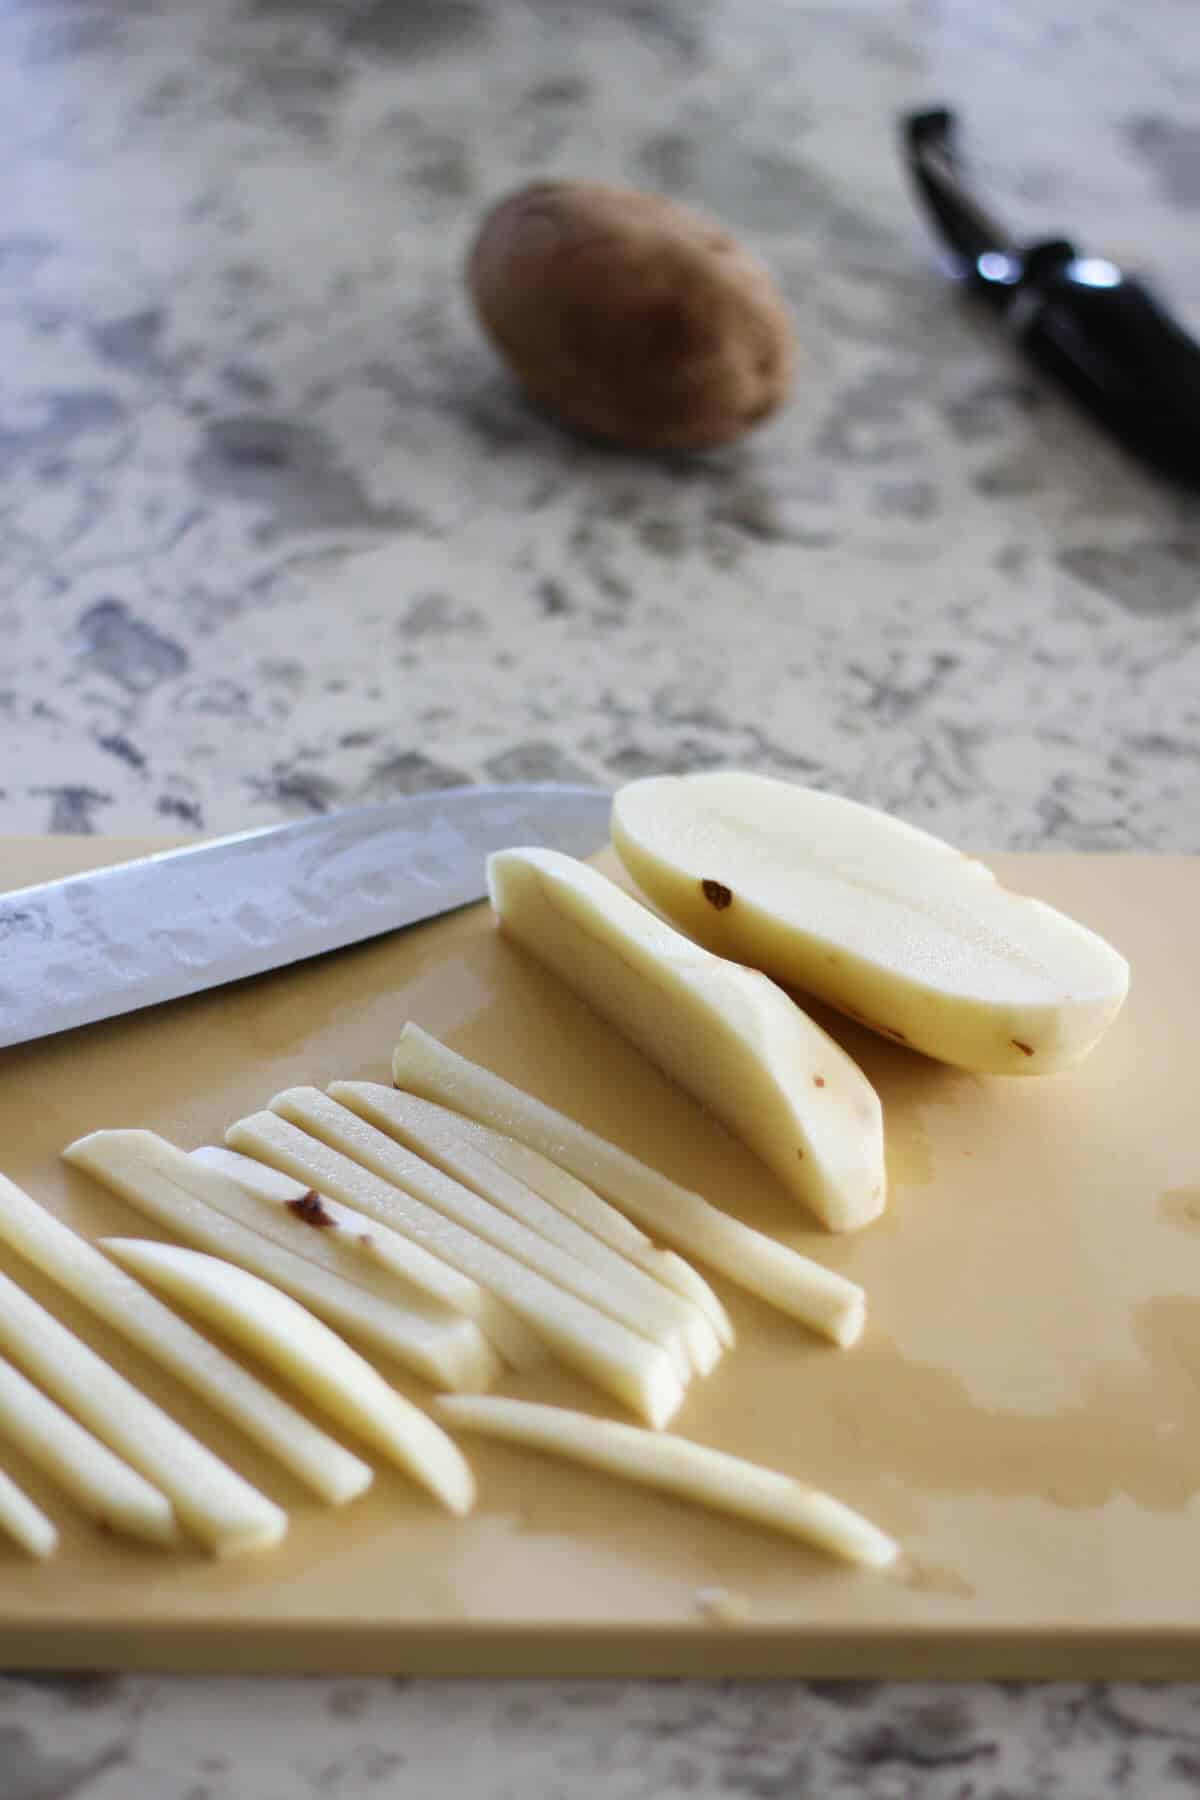
Here’s a picture of how thick I like to cut my fries; they don’t need to be exactly this size, but try to make your fries similar in size so that they cook as evenly as possible.
Toss the potatoes with oil, sprinkle with a touch of salt and pepper, then spread out onto a baking sheet lined with parchment paper.
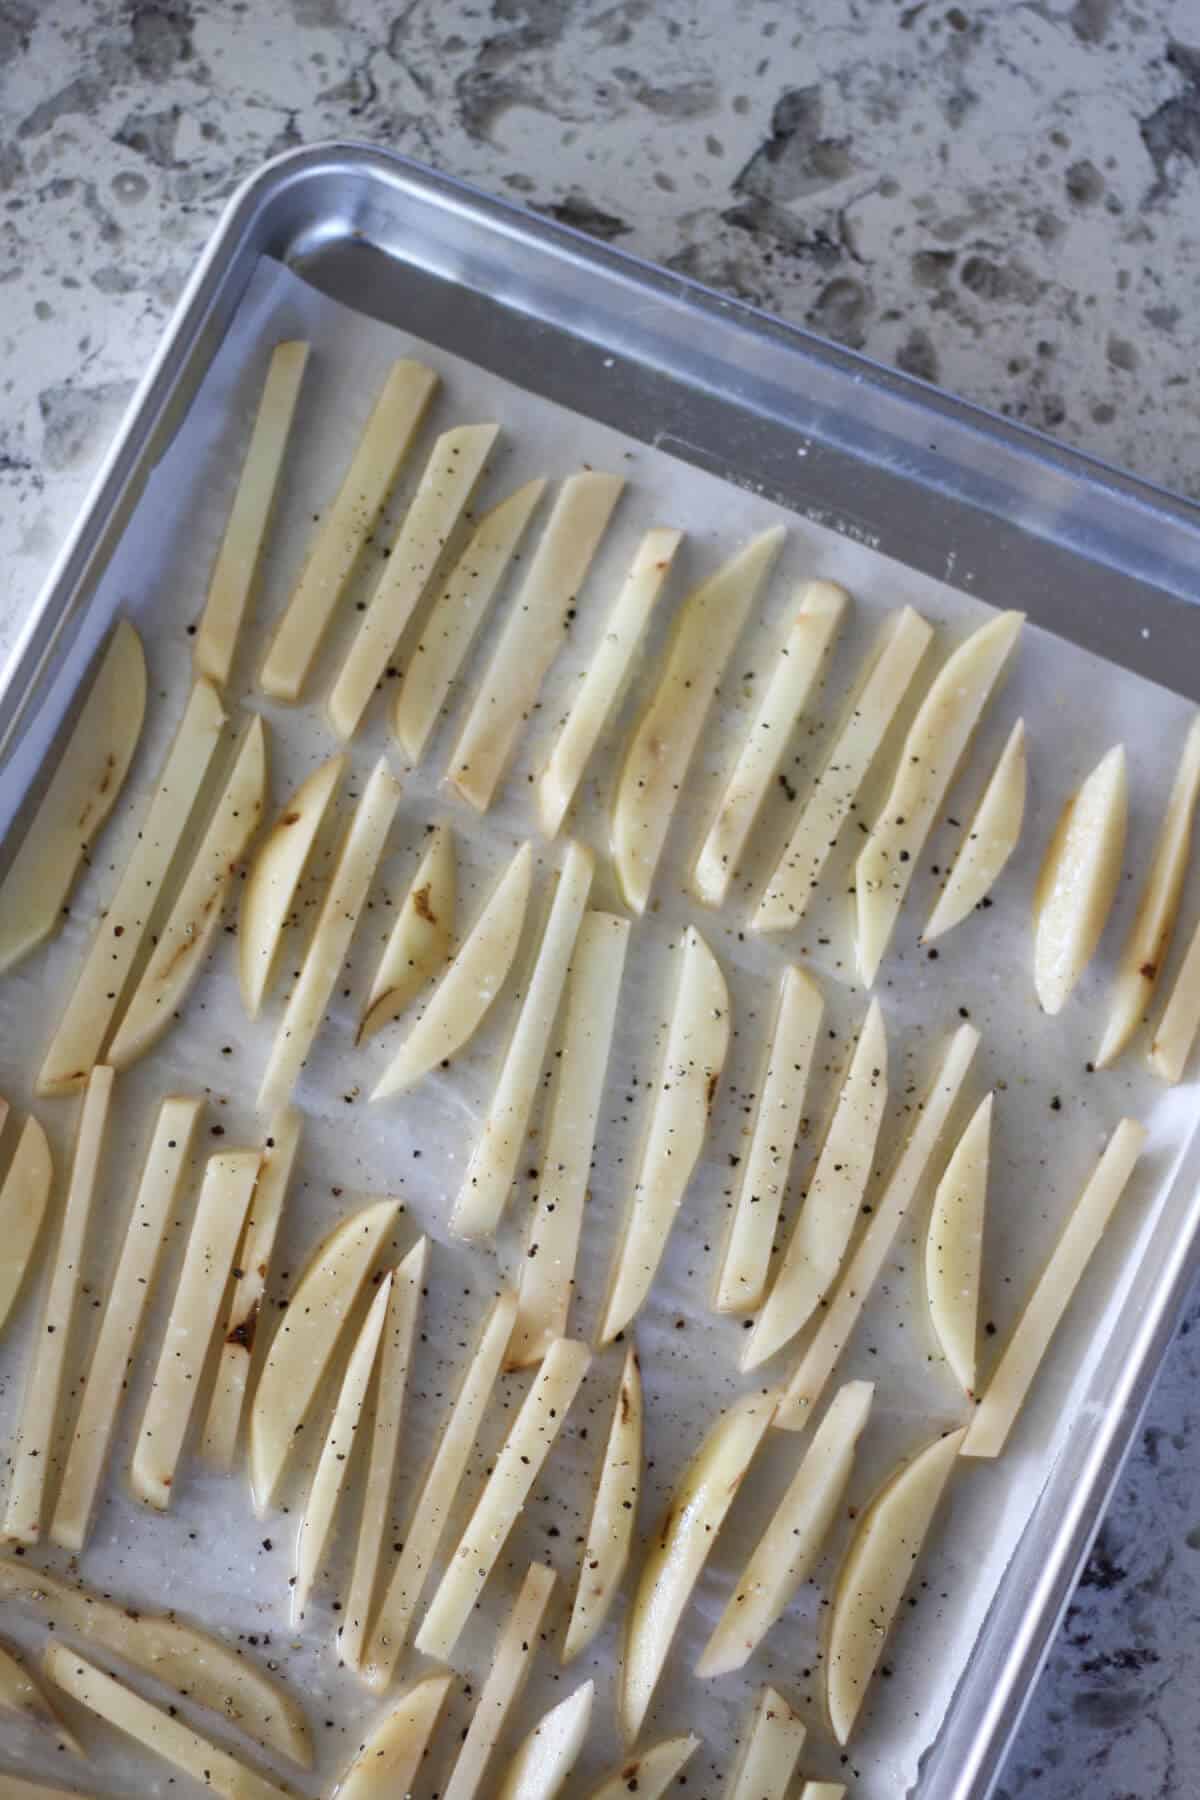
You want to make sure that the potatoes are spread out in a single layer with some space in between the fries. If they’re too close together, the potatoes end up steaming and your fries end up like the soggy leftovers from a fast food joint at closing.
Pop the fries in an oven preheated to 450F, and let them bake until crispy and golden all over. I like to flip a few that look like they’re getting a bit dark on the bottom to help them out a bit.
Any fries that are on the smaller side might be done before their bigger siblings, so feel free to take those off the pan midway through baking.
The timing will also differ depending on if your oven runs hot/cool, how many fries you’re making at once, and how spaced out the fries are, so keep an eye on them.
When the fries are done to your desired color and crispiness (I like them pretty deeply golden, while still soft on the inside when you press on or taste one), remove them from the oven.
Toss immediately with furikake. Season to taste with more salt and pepper if needed, then serve hot!
Tips
Parchment Paper
You might be tempted to use a reusable silicone mat in place of the parchment paper.
However, I wouldn’t recommend this because silicone isn’t as breathable as parchment, and it reduces conductivity, leaving your fries more susceptible to becoming soggy, sallow sadness.
You could forego the parchment or silicone altogether and place the potatoes straight on the pan, though you may have to pry your fries off and scrub your pan a bit during cleanup.
Oil
It might look like too much oil pooling on the sheet pan with the raw potatoes, or oil glistening on top of the cooked fries, BUT, you need all of it.
For one, having a good amount of oil on the potatoes lets them almost fry in the oven, rather than drying out and becoming an unappetizing stick of leather.
The oil also helps get the furikake to stick to the fries after they’re done cooking.
Storage and Reheating
These fries can be made up to a few days in advance, and stored in the fridge.
I would hold off on mixing the fries and furikake if you’re making them ahead of time. This way, the furikake stays crispy and fresh, and doesn’t threaten to burn on your fries.
You can reheat the fries in the oven (toaster or conventional) or airfryer, then toss with furikake while the fries are hot.
Serving Suggestions
Garnish
Sometimes the furikake sinks to the bottom of the fries, so it’s nice to sprinkle a little extra on top before serving!
Sauces
My favorite sauce for fries is hands down ketchup, no matter if they’re furikake fries or not. I will not be taking any questions at this time.
Maybe you’re in the mood for a little something special though, or perhaps a side option to that ketchup. In that case, might I interest you in soy garlic mayo?
Variations
Cooking Method
Deep Frying
I’m terrified of deep frying things and too lazy to deal with all that leftover oil, so I can’t help you with any tips. If you already know what you’re doing though, feel free to deep fry your fries!
Air Frying
During recipe testing, I was bracing myself for the fries to turn out amazing in the air fryer, especially because I know not everyone has an air fryer (my household, for example).
However, I was surprised that I liked the texture of the oven baked fries better than air fried fries; the air fried ones came out a little hard and chewy instead of crispy and crunchy on the outside.
Conclusion – use an oven, not an air fryer when making fresh fries (air fryer still works great for reheating already fried/cooked fries though!).
Shortcuts
This is one of the faster recipes on this site, but if you want something even faster, you could take some shortcuts with the potatoes.
You could pick up a pack of frozen french fries and cook those (air fryer fine in this case, or oven or deep fryer). Toss with some oil and furikake, and you’re done!
Or, for something even easier, you could pick up your favorite fast food fries. Add a little more oil if needed, reheat if they’re no longer piping hot, toss with furikake, and done!

Nori
Furikake is fairly easy to find in supermarkets these days (I am biased though, having only lived in towns within California with large Asian communities), or online if you’re striking out at grocery stores.
Maybe you still can’t find any furikake, or you have some leftover nori you want to use up; in that case, you can definitely make some adjustments.
Ideally you would use seasoned seaweed, shred that as finely as possible (if the nori is too big, it’ll have a hard time sticking to the popcorn), mix with sesame seeds, and toss with the popcorn.
If the seaweed you’re using isn’t seasoned, I’d recommend adding salt and a bit of sugar to taste to the popcorn as well.

- 2 potatoes
- ¼ cup flavorless oil
- salt and pepper to taste
- 2 ½ tablespoons furikake
-
Preheat the oven to 450F.
-
Peel the potatoes, then cut them into matchstick sized pieces. The exact size doesn’t matter so much as making sure that all of the fries are similar in size.
-
On 1-2 sheet pans (depending on how big they are) lined with parchment paper, toss the potatoes, oil, a big pinch of salt and a few grinds of pepper. Spread out the potatoes so that they’re in a single layer and have space between each fry.
-
Place the sheet pan(s) in the oven and roast for 20-25 minutes, or until golden brown on the outside but still soft on the inside. You may need to flip a few fries halfway through if they’re getting too dark on the bottom, or remove some of the smaller fries if they’re done before the rest.
-
Remove the potatoes from the oven and toss with the furikake while still hot. Add more salt and pepper if needed. Serve immediately with your sauce or condiment of choice!
Cooking time might be shorter or longer depending on how far apart your potatoes are spaced, or if you make a smaller/bigger sized batch.


Leave a Reply